Showing posts with label Tutorials. Show all posts

Saturday, December 16, 2017

Negative Painting - An Introduction (In 5 Steps!)

Top post on IndiBlogger, the biggest community of Indian Bloggers


As artists, we draw and paint many complex things using complex techniques but when we get back to some simple and basic stuff, it really makes one feel good...more so it's POSITIVELY FUN! It's again a validation of the fact that joy can be found in simplest of things.

What is negative painting?


Negative painting is painting around the subject than painting the subject itself. You are actually adding by subtracting. You move from lighter to darker as you go creating an illusion of depth and distance. It a process of layering...lighter layer to darker layer to the darkest.


FishPond-Negative-Painting-Detail-HuesnShades

Fish-Pond-NegativePainting-HuesnShades


Features

It’s actually fun as you don’t need to be an expert at painting to do a negative painting. You just pick up some forms, shapes and paint around it. Once you get the hang of it, it’s pretty easy.


  • When you start, you could just sketch some shapes, forms and start painting around it.
  • Watercolour seems to be the best medium for it because of its transparency and the glow that it would apparently provide.
  • No details needed just blocking out the shapes.
  • Let each layer dry before you apply the next layer.


How to do a negative painting?

Things needed:

Handmade paper (You can use any watercolour paper/textured paper etc)
Colours used - Lemon yellow, Gamboge hue, Ultramarine blue and Cobalt blue hue. (I have used Camlin Artists' watercolour cakes)
Brushes

1. Firstly I dampened the paper and glided my brush loaded with lemon yellow and then gamboge hue across the paper for the background. Lifted off some paint with tissue paper as I wanted a pale look. (At this point I was thinking what shape to draw. If I had made up my mind on fish beforehand I wouldn't have painted with these colours though. I was actually thinking of flowers while painting this background!)

Unexpectedly I decided on fish and thought of going along with it as the yellow was pale and so drew some fish forms here.


FishPond-NegativePainting-Step1-HuesnShades


2. I painted the next layer with ultramarine blue but very lightly around the fish.


FishPond-NegativePainting-Step2-HuesnShades


3. The next layer I used cobalt blue hue after adding a couple more fish.


FishPond-NegativePainting-Step3-HuesnShades


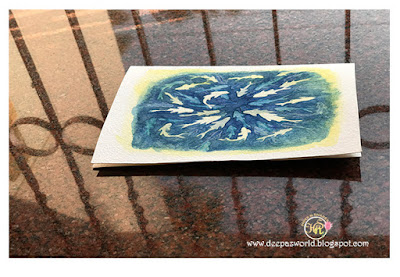
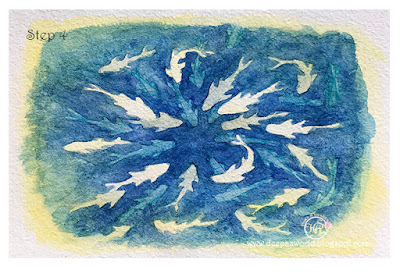
4. Again I added a few more fish and painted the fourth layer using ultramarine blue. 


FishPond-NegativePainting-Step4-HuesnShades


5. The fifth layer I mixed cobalt blue hue and a tinge of black after adding a some more fish.


FishPond-NegativePainting-Step5-HuesnShades

And that's done!

I have used just 5 layers here (the steps are 6 because I added the fish . You could use less or many more layers depending on the size of your work.


These two are my first and second attempts which was done simultaneously. They have just 3 and 2 layers respectively and are done on regular postcards.

Leaves-NegativePainting-HuesnShades
 with Gamboge hue, Orange and Scarlet


Trees-NegativePainting-HuesnShades
with Sap green and Emerald green


These 2 designs were inspired from pictures I saw while browsing.

Linda Kemp is a Canadian artist who has some fabulous negative paintings to her credit. She is an instructor in Artists Network and you can find some good videos of hers in YouTube. You can check out her works there. There are two other artists' whose art I really love and both of them have done some negative paintings too and they have taken it to a different altitude! It's Iraville and Pearfluer - checkout these videos...


Hope you enjoyed this post. Do leave me your feedback.

If you wish to check out my earlier postcard series you can click HERE.


Linking it to the Gorgeous PPF community!


Friday, August 19, 2016

How to paint Sunset in 5 simple steps

“A sunset is the sun’s fiery kiss to the night.” 
 Crystal Woods


Preparing-a-base-HnS
Preparing the base


Base-layer-HnS
 After adding yellow, yellow ochre and Indian yellow


Adding-Orange-HnS
 After adding orange


Adding-ScarletLake-HnS
After adding scarlet lake 


Adding-RawSienna-HnS
After adding raw sienna


Adding-RawUmber-HnS
 after adding raw umber, the sunset is ablaze...


I have used dry brush technique. No water to dilute the colours. Paints straight from the tube. I love the effect and feel of it. Was it useful? 
Please do leave me your feedback. 


Friday, February 13, 2015

Love is in the Box!

People through generations have spoken, sang, discussed, debated, argued and even killed for (and about) love. Each one of us have a view/opinion on the subject. If it's an occasion such as Valentine's Day, then Love is really in the air...everywhere. It's a way to stir up, invoke and rejuvenate love. Here's something I have done for you...packed 'tiny-teeny bit of loves' in packs...small boxes. You could spread love in such cute little boxes too...just check this DIY...especially for you...
Happy Valentine's Day!


O Love!Thou Makest All Things Even

O Love! Thou makest all things even
In earth and in heaven;
Finding the way through prison-bars
Up to the stars;
Or, true to the Almighty plan,
That out of dust created man,
Thou lookest in a grave, --to see
Thine immortality!

~Sarah Fuller Flower Adams


Loveisinthebox-HuesnShades
Aren't these cute???
If yes, you can do it too...

Here's How:
Materials Needed:

Matchbox
A4 White papers 
~(or white paint to color the matchbox. I have used white papers and decoupaged it to the surface of the matchbox)
Pattern papers (can also be used to cover the matchbox)
Glue
Scissors
3D liner(white)
Red acrylic ink
Red sketch pen
Gel texture bead
Red Felt 
White stone
Bronze pearl metallic paint.
Brush
Pencil
Heart shaped mould


Picture Instructions:

Loveisinthebox1-HuesnShades

1. Cut the white paper according to the size of the match box.
2. Pasted it around the box with mod podge.
3. Outline the heart mould with pencil and then with 3D liner.
4. Let dry or use a hair dryer.
5. Fill it with red acrylic ink.
6. Outlined the other side of the white liner with red sketch.
7. Let dry and then fill it with designs using the liner.
8. Now write a short sweet poem or choose one from any of the sites (do not forget to give credit).
9. Write it on to a strip of paper that fits inside the box making it into an accordion.
10. Stick the end of the last line inside the box.
11. Close it and surprise your beloved one!


Loveisinthebox2-HuesnShades

1. Repeat the first two steps (1 & 2)
2. Take pearl bronze metallic paint on a palette.
3. Place the heart mould on the paint and stamp it on the top of  the box.
4. Fill it with red acrylic ink.
5. Let dry or use a dryer.
6. Place bead gel texture on top of it.
7. Let dry and the glass bead effect will be visible.
8. Now follow the steps to add the poem as mentioned above (8,9 & 10).
9. Close it and surprise your beloved one!


Loveisinthebox3-HuesnShades

1. Repeat the first two steps (1 & 2)
2. Outline the heart mould with pencil on the felt and scissor it :)
3. Add a masking tape or a double-ended sticker tape on the back of the felt heart.
4. Add a heart with a white liner.
5. Let dry or use a dryer.
6. Place white stone on top of it.
7. Now follow the steps to add the poem as mentioned above (8,9 & 10).
8. Close it and surprise your beloved one!


The first two short poems written in Malayalam (my mother-tongue) is my own and the third one in English is the poem by Sarah Fuller Flower Adams is typed on top.

Have fun, surprise beloved ones and make everyday a Valentine's Day!

Hope you enjoyed this special post. Please do leave your comments and suggestions in the comment section or you can mail me at mail.huesnshades@gmail.com.

Linking it to Eva and Kristin's PPF

You can also read one of my popular Valentine's Day posts here & here.


All the images and content is copyright of Deepa Gopal Sunil. Please do not use it without prior permission/consent from the artist.

Wednesday, December 24, 2014

Match Box/Stick Ornament - Christmas Fun


Top post on IndiBlogger.in, the community of Indian Bloggers

How many of you collect used match box and match-sticks???
Some of us artsy crafty types do...Agree?
In fact, we hoard so many so-called "useless" stuff :)
I came up with an idea for a small workshop last Saturday particularly for Christmas and the kids totally loved it :) This week there are two DIY's in here.

I couldn't publish this post on Friday as usual and as I expected...extremely sorry for that. For the very first time, I am sharing my art class photos here. I don't usually do that...Even when I was taking classes in Dubai I hadn't done that. But I think kids would love it too to see themselves presented in my blog. So here they are...they are a small class, I started it a couple of months back in my hometown. 

If you haven't seen my first  and second DIY of this Christmas season, you should hop over HERE & HERE.

Thanks to Sigga, Poornima and Angela for linking it up with their cool Xmasy crafts :)

You can find the materials needed and the procedures in the picture tutorial below.

The First DIY

matchbox-ornament-materials-HuesnShades


matchboxornament-step1-HuesnShades


matchboxornament-step2-HuesnShades


matchboxornament-step3-HuesnShades


matchboxornament- step4-HuesnShades


matchboxornament-step5-HuesnShades

Make a hole and insert the metal wire and twist it both the sides so that it would form a loop and won't come out.

matchboxornament-step6-HuesnShades


The second DIY is with used match sticks...and it's super easy imitation of a snowflake!

matchstick-ornament-HuesnShades


matchstickornament-step1-HuesnShades


matchstickornament-step2-HuesnShades


matchstickornament-step3-HuesnShades


matchstickornament- step4-HuesnShades


matchstickornament-step5-HuesnShades

You could even embellish the edges with white stones to give it a dazzle and shine. 

Here are my lovely kidos holding their priced possessions :)

Lovely-kidos-with-matchbox-ornament-HuesnShades


Lovely-kidos-with-matchstick-ornament-HuesnShades

Click on the images to view it large


Hope you enjoyed these DIY's. Please do let me know your thoughts, would love to hear from you :)


If you have a blog post on a  Christmas DIY, decor idea, makeovers, Christmas recipes or anything related to Christmas you can add your link HERE

Please do mention #HuesnShadesXmasDIY and link it back to the particular blog post/URL. 

Let us enjoy our artsy time, create and collaborate...


Linking it to Eva & Kristin's Paint Party Firday. Do join us there and be amazed all the wonderful happenings over there :)


And one final pleasant news...My blog is the Featured Blog of the Day in Blogadda...Yay!!!


Thank you Blogadda!


Please do not use/reproduce the content (words as well as images) without the written consent of the author.

Friday, December 12, 2014

Zing With Bling - Christmas DIY

Top post on IndiBlogger.in, the community of Indian Bloggers

Today's DIY is super easy...what you need for it is a spoiled art on canvas!!! The one I have used is a few years old painting which I never completed. I wasn't really happy about it and had tucked it away for so long that I even forgot that this frame existed (that's a bit of an exaggeration though!) but seriously I wanted to do something with it. So thought of giving it a makeover this Christmas.

The name that came instantly to my mind after completing the project was 'Zing with Bling'...it rhymes ok but what I wish you to grasp is the lively feel of it with all the gold and silver :) 

Before going into the details, let me thank everyone who took the time to visit and leave beautiful comments of inspiration (particularly Natalie who inspired to do the previous DIY), to those who liked in FB and to all those shares too :) Isn't festivities so heart-warming!!! Thank you my dear friends for all the love and support.

I have introduced linky for the very first time in the previous post with the thought of collecting/collaborating/treasuring all the delectable DIYs of this season. I would encourage and request everyone to please link it up HERE. Thank you Disha for being the first to link :)

So now, get your supplies ready.

Materials Required

Canvas 
*Acrylic Paints 
Brushes 
Scissors
Insulation tape
Cream, Gold and Silver paints

*If you wish to paint it with various colours as you please to make a colorful background.


Makeover-HuesnShades

This is a gallery wrapped canvas, ready to hang one that I bought from Dubai. I miss these canvas as I haven't seen them in the art shops here. What you can do is either you can take an old art that you were pondering to do a makeover with or take a blank canvas and apply multicolored paints hap haphazardly as you please all over. Remember to use multicolors! Let it dry completely.

Makeover-with-Tape-and-Scissors-HuesnShades

Cut the tapes according to your wish and stick it as per you want them to be. I just went by my instincts. I didn't measure them, it wasn't pre-planned...I just went on with what I felt will look good.

Taped-HuesnShades

This is it looked after completely sticking the tapes.

Offwhite-Paint-HuesnShades

 Now, apply a cream colored, white or off-white  paint all over the canvas with broad, flat brush. Let dry thoroughly.

Gold-Paint-HuesnShades

Apply gold paint on top of it, again all over it except for the sides of the canvas. Let dry.

Silver-Paint-HuesnShades

Time to apply silver on the sides. The sides of the canvas are broader and I love it. It gives a projection to the canvas and your art will pop up :)

Gold-Layer-Paint-HuesnShades

To give it a little more 'oomph' I decided to add a thin layer/wash of gold on the strips in between. Let dry and then peel of the tapes carefully.

Zing-with-Bling-Side-HuesnShades

A view from the side!

Zing-with-Bling-HuesnShades

Here's how it looks!!! It looks better than this in person :)

Click on the images to view it large.


If you haven't seen my first DIY of this Christmas season, you should hop over HERE


If you have a blog post on a  Christmas DIY, decor idea, makeovers, Christmas recipes or anything related to Christmas you can add your link HERE. Please do mention #HuesnShadesXmasDIY and link it back to the particular blog post/URL. 

Let us enjoy our arty time, create and collaborate...


Please do let me know your thoughts, would love to hear more from you :)


Linking it to Eva & Kristin's Paint Party Firday. Do join us there and be amazed all the wonderful happenings over there :)

Please do not use/reproduce the content (words as well as images) without the written consent of the author.


Friday, December 5, 2014

DIY - Notepad (Christmas Fun)

Top post on IndiBlogger.in, the community of Indian Bloggers


Festivities are once again around the corner and many would have started wondering what to gift to their loved ones. Why not try something hand-made this season???

Yes! Make something with a little time and lot of love...hand over these goodies in dazzling wraps, surprise and exchange hugs and kisses :)

I have prepared a small DIY for notepads and this is from Cremedelacraft.com
They have made some AWESOME notepads and I have tried my version here with whatever I had at hand. I had limited supplies and I think we can make the best use of what we have!
Love Upcycling??? Then this is just perfect for you :)

The materials you need are impossibly available in every home except for brads.

Materials Needed:
  
Ready-to-cast-away boxes (Eg: horlicks box, cornflakes box etc...I have used paint tubes box here)
Pattern papers (even colorful newspapers can be used)
Embroidery threads (cotton twines are fine too)
Ruled/Unruled  papers
Glue
Scissors
Needle (to pin a hole)
Brads
Doilies and Borderlace (optional)

If you have paper cutters then cutting would be neat and the notepads would turn out to be even better. I used my scissors here.

Notepads-HuesnShades

Materials-Required-HuesnShades

Notepad-Step1-HuesnShades

Notepad-Step2 HuesnShades

Notepad-Step3-HuesnShades

Notepad-BradSecured-HuesnShades

Notepad-Step4-HuesnShades

Notepad-Finished-HuesnShades

Please do let me know your thoughts. Would love to hear from you. There's more coming up this December so stay tuned to the celebrations :)

Linking to Eva & Kristin's PPF.

Enjoy your arty time, create and collaborate...Mention #HuesnShadesXmasDIY with a link to this particular blogpost in your Xmas post :)

You can also add your Xmas DIYs, Decor ideas and Xmas fun stuff below... You just need to click on the linky and enter the required details. So join the fun and we can go ahead with a bloghop :)


Please do not use/reproduce the content (words as well as images) without the written consent of the author.